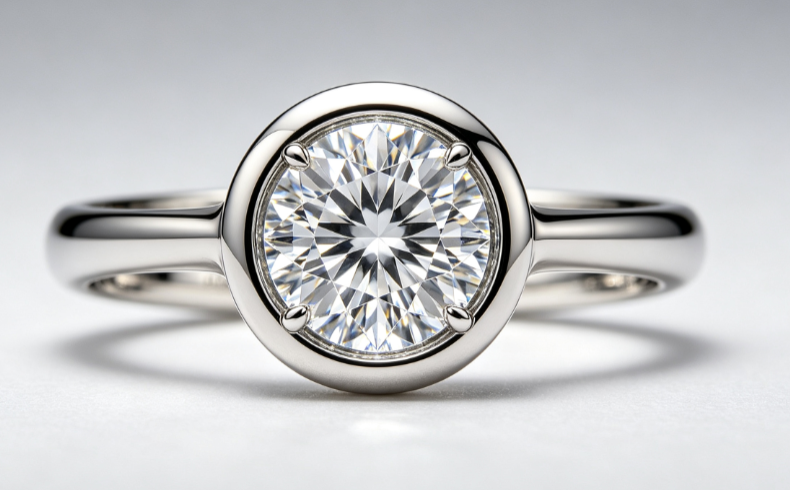
A bezel setting lab grown diamond ring replaces prongs with a continuous rim of metal that wraps around the stone, holding it in place from every side at once. Instead of gripping the diamond at four or six points, the bezel surrounds the girdle — the widest edge of the stone — with a smooth collar of gold or platinum. The result is one of the most secure, most protective, and most contemporary-looking settings available for a lab-grown diamond. This guide explains exactly what a bezel setting is, how it is made, when it is the right choice, and what trade-offs you accept in exchange for its protection.
What Is a Bezel Setting?
A bezel setting holds a diamond with a thin wall of metal — the bezel itself — that encircles the stone’s outer edge. The jeweler seats the diamond into a precisely shaped rim, then presses and polishes the metal over the girdle so the stone is locked in place along its entire circumference.
The bezel can cover the diamond in two ways:
- Full bezel — the metal rim runs all the way around the stone, leaving only the crown and table visible. This is the classic form and the most protective version.
- Partial bezel (half bezel) — the metal wraps only two sides of the stone, usually north and south, leaving part of the girdle exposed. It protects where it matters while showing more of the diamond.
Both versions share the same core idea: replace point contact with continuous contact. Where a prong touches the stone at four small spots, a bezel embraces it along a complete circle.
How a Bezel Setting Is Made
Making a good bezel is precision work. The inner edge of the rim must match the outline of the diamond to within fractions of a millimeter — too loose and the stone will rattle, too tight and the stone can be stressed during setting.
The typical production sequence looks like this:
- The bezel is cast or milled to the exact outline of the stone
- A seat is cut inside the rim at the height of the girdle
- The diamond is placed in the seat, table up
- The rim is pushed evenly over the girdle, section by section
- The edge is burnished smooth and polished until the metal meets the stone seamlessly
Each step depends on the step before it. If you want to see how this fits into full production, our guide to the diamond setting process step by step walks through the journey from mounting to final inspection.
Why Choose a Bezel Setting for a Lab-Grown Diamond?
Maximum edge protection
A lab-grown diamond is every bit as hard as a mined diamond, but like any diamond it can chip along an edge or girdle if struck hard enough. A bezel shields the entire perimeter of the stone with metal, so a knock against a doorframe or a countertop hits the setting — not the diamond. For stones with pointed tips or sharp corners, such as marquise and pear cuts, this kind of wraparound protection matters even more; the same principle behind the V-prong setting for marquise and pear lab-grown diamonds applies, but a custom bezel goes further by covering the vulnerable area completely.
Unmatched security
Because the metal contacts the stone continuously rather than at points, a well-made bezel almost never loosens on its own. Prongs can catch on fabric and slowly bend outward over years; a bezel has nothing to snag and nothing to bend. Among all the styles compared in our guide to which diamond setting is most durable, the bezel sits at the top of the list.
A low, comfortable profile
A bezel sits close to the finger, without tall prongs rising above the stone. Nurses, teachers, athletes, parents of small children, and anyone who works with their hands appreciate what that means: no scratching, no catching on gloves or sweaters, and a ring that simply stays out of the way. If you are comparing low-profile styles, our article on flush setting vs bezel setting breaks down how the two protection-first designs differ — and the flush setting remains the flattest option of all if absolute minimalism is your goal.
A clean, modern look
A bezel frames the diamond in a smooth halo of metal, which reads as sleek and contemporary. On a round brilliant — as in the image above — the unbroken circle of white gold emphasizes the perfect symmetry of the stone. On fancy shapes, a shaped collar traces the outline of the diamond like a line drawing.
The Trade-Offs of a Bezel Setting
No setting is perfect for everyone, and the honest answer to “what is a bezel setting” includes its limitations:
- Less light from the sides. The rim covers the girdle, blocking some side illumination. With a well-cut stone the difference is subtle, but brilliance-focused buyers sometimes prefer open prongs.
- More metal means more weight. A full bezel uses noticeably more gold or platinum than prongs, which adds to the cost of the mount.
- Stone swaps are harder. Replacing the center stone requires reworking the rim rather than retightening prongs.
- Fixed sizing range. Bezel-set bands can still be resized within limits, but major size changes are more involved than on plain shanks.
None of these are dealbreakers for most wearers — they are simply the price of the bezel’s protection.
Which Diamond Shapes Suit a Bezel?
Round brilliants are the natural fit: the circular bezel follows the stone’s geometry perfectly, as the white gold round brilliant pictured here shows. Ovals, emeralds, cushions, and asschers also take beautifully to shaped collars. For pointed shapes like marquise and pear, a bezel must be custom-shaped to protect the tips — worth doing if those stones lead your shortlist. Our guide to diamond setting types and which suits each cut matches every major shape to its safest options, and our roundup of the best settings for lab-grown diamond engagement rings shows where the bezel ranks across different styles and lifestyles.
Choosing the Metal for Your Bezel
The bezel is the visual statement of the ring, so the metal deserves real thought:
- White gold delivers the sleek, monochrome look in the photo above and pairs invisibly with white diamonds. Our comparison of 18K vs 14K vs 9K gold explains how karat affects hardness and long-term wear.
- Platinum offers maximum durability for a setting that takes daily knocks, though it costs more; see our breakdown of platinum vs 18K white gold for settings.
- Yellow or rose gold creates a warm frame that contrasts beautifully against a colorless stone.
Sourcing a Quality Bezel Setting
Because bezel quality depends entirely on fit, workmanship matters more here than in almost any other style. A rim that sits unevenly, gaps at one point, or over-covers the crown will be visible every time you look at your hand — and can compromise the stone’s security. That is why many jewelers buy diamond ring settings only from a factory, where CNC-guided bezels and consistent tolerances are standard, and why it helps to understand how a factory catches setting defects before shipping.
Conclusion
So, what is a bezel setting? It is the setting that trades a little sparkle at the edges for total peace of mind: a continuous metal collar that protects the entire girdle of your lab-grown diamond, resists snags, sits low, never loosens, and looks unmistakably modern. Choose it if you live actively, love clean design, or are protecting a stone with vulnerable corners — and source it from makers who hold tight tolerances. When you are ready to have one made, working directly with an experienced lab-grown diamond manufacturer ensures the bezel is built around your exact stone.